Pokémon Card App: Exploring REST API in Dart and Flutter

I am a mobile developer, who is interested in building pixel perfect products, interactive user experiences and I am also a technical writer who enjoys explaining hard topics into comprehensible bits, digestible to people on any level.
Introduction
The Pokémon universe has captivated millions of fans worldwide, and the thrill of collecting Pokémon cards is unmatched. What if you could bring that excitement to the digital realm?
In this article, we will embark on an exciting journey to create a Pokémon Card app using Dart and Flutter. Our primary focus will be leveraging REST APIs to fetch Pokémon data and dynamically generate Pokémon cards. Along the way, we'll delve into the fundamentals of working with REST APIs, making network requests, and handling data in a Flutter application.
Understanding REST APIs
REST APIs have emerged as a cornerstone for creating dynamic and interconnected applications in app development. REST (Representational State Transfer) APIs provide a standardized and platform-independent way for applications to communicate and exchange data over the Internet. They enable developers to seamlessly integrate external systems and access different data sources and functionalities.
Prerequisites
Fundamental knowledge of Flutter and Dart
An emulator or a smartphone for debugging
Set up a Flutter Project
Before we begin, make sure you have the following installed:
Flutter SDK
Dart SDK
Code editor (e.g., Visual Studio Code, Android Studio)
A Flowchart of the Application
Let’s get the rundown on how the app is going to work. Once you launch the app, you will see a button that says generate, When you tap on the button, you will see a Pokemon character, and if that doesn’t happen, you’ll see a dialog box telling you why it didn’t work and an action button.
Let's visualize the flow of actions using a flowchart. Take a look at the diagram to get a better understanding.

fig 1. A Flowchart of the Application
Create the Pokemon Card Application
To create the Pokemon card application, we'll follow these steps:
Set up a new Flutter project:
Open your terminal or command prompt.
Run the command:
flutter create pokemon_card_app
- Navigate to the project directory:
cd pokemon_card_app
Open the project in your preferred code editor.
Add dependencies:
Open the pubspec.yaml file.
Add the following dependencies under the dependencies section:
  Dependencies:

  flutter: sdk:
  http: ^0.13.3
  flutter flip_card: ^0.5.1
  google_fonts: ^2.1.0
  flutter_spinkit: ^5.1.0
Save the file and run flutter pub get in the terminal to fetch the dependencies.
Make HTTP Requests with Dart
An Overview of the HTTP package in Dart
The HTTP package in Dart provides a straightforward and efficient way to make HTTP requests and handle responses in Dart applications. It simplifies interacting with APIs and retrieving data from external sources.
Dart's HTTP package offers classes and methods that allow developers to send HTTP requests and handle responses.
It supports various HTTP methods such as GET, POST, PUT, DELETE, etc., and provides functionalities to set headers, pass query parameters, and handle cookies. The package also supports working with JSON, allowing developers to quickly parse and serialize JSON data.
In this article, you will only be using the GET methods to retrieve data from the Pokemon API
Implement Functions to handle API Requests and Responses
To demonstrate the implementation of functions for handling API requests and responses, we'll use the HTTP package in Dart. First, make sure to include the HTTP package in your project by adding the following import statement to your Dart file:
import 'package:http/http.dart' as http;
Make a GET request
To make a GET request to an API endpoint, you can use the get function provided by the HTTP package. Here's an example:
Future<void> fetchData() async {

var url = Uri.parse('https://api.example.com/data');
var response = await http.get(url);
if (response.statusCode == 200) {
// Successful response
var data = response.body;
// Handle the retrieved data
} else {
// Error handling
print('Request failed with status: ${response.statusCode}.');
}
}
Design the Pokémon Card UI
Designing the layout and structure of a Pokémon card is crucial to creating an appealing and user-friendly UI. The card serves as a visual representation of the Pokémon and provides essential information to the user. Let's discuss the planning of the layout and structure and how to utilize Flutter widgets to create a visually appealing and interactive Pokémon card.
Layout and Structure of the Pokémon card
The layout and structure of the Pokémon card will consist of a "Column" with a "FlipCard" widget as the main component. The card's front side displays the Pokémon's "sprite" and "name", while the back side will show the Pokémon's "ID", "abilities", "type", "height", and "weight". The design utilizes "Container", "Column", "SizedBox", "Text", "Image", "CircularProgressIndicator", and custom widgets to create the Pokémon card.
Now let's dive into the code for the Pokemon card:
Firstly Open the lib directory and create a new file named "flipping_card.dart".
Then in this file, we'll import the following:
After importing, create a stateless widget called "FlippingPokemonCard".
class FlippingPokemonCard extends StatelessWidget {
  final String type;
  final int height;
  final int weight;
  final int id;
  final String name;
  final String sprites;
  final String abilities;

  const FlippingPokemonCard({
    super.key,
    required this.type,
    required this.height,
    required this.weight,
    required this.id,
    required this.name,
    required this.sprites,
    required this.abilities,
  });

  @override
  Widget build(BuildContext context) {
    return Column(
      mainAxisAlignment: MainAxisAlignment.center,
      children: [
        Center(
          child: Container(
              height: MediaQuery.of(context).size.height * 0.5,
              width: MediaQuery.of(context).size.width * 0.9,
              child: FlipCard(
                  front: Container(
                    decoration: BoxDecoration(
                      color: Colors.amberAccent,
                      borderRadius: BorderRadius.circular(20),
                      boxShadow: [
                        BoxShadow(
                            color: Colors.black,
                            offset: Offset(0, 3.0),
                            blurRadius: 9.0,
                            spreadRadius: 2.0)
                      ],
                    ),
                    child: Column(
                      children: [
                        SizedBox(
                          height: 10,
                        ),
                        Expanded(
                          child: Image.network(sprites,
                              loadingBuilder: (context, child, loadingProgress) {
                            if (loadingProgress == null) {
                              return child;
                            }
                            return Center(child: CircularProgressIndicator());
                          }),
                        ),
                        SizedBox(height: 10),
                        Text(
                          'Name: $name',
                          style: TextStyle(
                            fontWeight: FontWeight.bold,
                            fontSize: 30,
                          ),
                        ),
                      ],
                    ),
                  ),
                  back: LayoutBuilder(builder: (context, contraints) {
                    return Container(
                      decoration: BoxDecoration(
                        boxShadow: [
                          BoxShadow(
                              color: Colors.black,
                              offset: Offset(5.0, 5.0),
                              blurRadius: 10.0,
                              spreadRadius: 2.0)
                        ],
                        color: Colors.yellow,
                        borderRadius: BorderRadius.circular(20),
                      ),
                      child: Column(
                        crossAxisAlignment: CrossAxisAlignment.center,
                        mainAxisAlignment: MainAxisAlignment.start,
                        children: [
                          SizedBox(
                            height: 20,
                          ),
                          Text(
                            'ID: ${id.toString()}',
                            style: TextStyle(
                              fontWeight: FontWeight.bold,
                              fontSize: 59,
                            ),
                          ),
                          SizedBox(
                            height: 10,
                          ),
                          Text(
                            'Name: $name',
                            style: TextStyle(
                              fontWeight: FontWeight.bold,
                              fontSize: 30,
                            ),
                          ),
                          SizedBox(
                            height: 10,
                          ),
                          if(contraints.maxHeight > 300)
                          Expanded(
                            child: Text(
                              'Ability: $abilities',
                              style: TextStyle(
                                fontWeight: FontWeight.bold,
                                fontSize: 25,
                              ),
                            ),
                          ) else Text(
                              'Ability: $abilities',
                              style: TextStyle(
                                fontWeight: FontWeight.bold,
                                fontSize: 30,
                              ),
                            ),

                          SizedBox(
                            height: 10,
                          ),
                          Text(
                            'Type: $type',
                            style: TextStyle(
                              fontWeight: FontWeight.bold,
                              fontSize: 30,
                            ),
                          ),
                          SizedBox(
                            height: 10,
                          ),
                          Text(
                            'Height: ${height.toString()} mm',
                            style: TextStyle(
                              fontWeight: FontWeight.bold,
                              fontSize: 30,
                            ),
                          ),
                          SizedBox(
                            height: 10,
                          ),
                          Text(
                            ' Weight: ${weight.toString()} LBS',
                            style: TextStyle(
                              fontWeight: FontWeight.bold,
                              fontSize: 30,
                            ),
                          ),
                        ],
                      ),
                    );
                  },),),),
        ),
        SizedBox(
          height: 10,
        ),
      ],
    );
  }
}
This is a lot of code, so you can take a minute to go through it and understand what is happening, but here is a breakdown of the layout and structure of the Pokémon card:
The "FlippingPokemonCard" widget extends "StatelessWidget", indicating it won't have any mutable state.
The widget's constructor takes several required parameters, such as type, height, weight, id, name, sprites, and abilities. These parameters represent the information about a specific Pokémon that will be displayed on the card.
Inside the "build()" method, the widget is structured as a "Column" widget. This allows us to vertically arrange the components of the card.
The card is implemented using the FlipCard widget from the "flip_card" package. It takes two child widgets: the card's front and back. The card flips horizontally to reveal the back when tapped.
The front side of the card is wrapped inside a "Container" widget. It has a decoration property that defines the appearance of the card. It includes a background color, border radius, and a shadow effect.
Inside the front side of the card, there is a "Column" widget containing the following components:
A "SizedBox" for adding some vertical spacing.
An "Image" widget to display the Pokémon's sprite. It loads the image from the given sprites URL. While the image is loading, a "CircularProgressIndicator" is shown.
A "Text" widget displaying the Pokémon's name.
The back side of the card is implemented using the "LayoutBuilder" widget. It allows us to adjust the layout based on the available space.
Inside the "LayoutBuilder" is a "Container" widget with similar decoration to the front side of the card. It includes a background color, border radius, and shadow effect.
Inside the back side of the card, there is a "Column" widget containing the following components:
A conditional rendering of the ability Text widget. If the card's height exceeds 300, the ability text is wrapped inside an "Expanded" widget to allow it to take up the remaining vertical space. Otherwise, it is displayed without the "Expanded" widget.
"Text" widgets display the Pokémon's name, ID type, height, and weight.
Create a Model Class to parse the JSON.
Create a folder inside the lib folder called models; then, in this models folder, Create a file called "pokemon.data"; this is the file where you will write the code for the Dart Object;
The model is a class that holds the data gotten from the API, like the name, height, etc., and this class will house a function to convert the JSON data to a Dart object.
class PokemonInfo {
  String type;
  int height;
  int weight;
  int id;
  String name;
  String? sprites;
  String abilities;

  PokemonInfo(
      {required this.type,
      required this.height,
      required this.weight,
      required this.id,
      required this.name,
      this.sprites,
      required this.abilities});
}
In the code snippet above, you just created a model, and the model is called “PokemonInfo”. The “PokemonInfo” class represents a Pokemon information object with properties like "type", "height", "weight", "id", "name", "sprites", and "abilities". The class has a constructor that assigns named parameters to the corresponding class properties.
Parse JSON Data and convert it into a Dart object.
As I mentioned earlier the “PokemonInfo” class is also going to have a function to convert the JSON data to a dart object so let’s do that.
Import the “dart:convert” file into the file so that we can convert the data.
import' dart:convert';
The next step is to write the function called “pokemonInfoFromJson” inside the “pokemonInfo” class.
The "pokemonInfoFromJson" function takes a JSON string as input (String str). It uses the "json.decode" function from the "dart:convert" library to parse the JSON string into a dynamic data structure. It calls the "PokemonInfo.fromJson" factory constructor passing the decoded JSON data and it returns the created "PokemonInfo" object.
PokemonInfo pokemonInfoFromJson(String str) => PokemonInfo.fromJson(json.decode(str));
factory PokemonInfo.fromJson(Map<String, dynamic> json) {
return PokemonInfo(
type: json['types'][0]['type']['name'] ?? 'Unkwown',
height: json['height'] ?? 0,
weight: json['weight'] ?? 0,
id: json['id'] ?? 0,
name: json['species']['name'] ?? 'Unkwown',
sprites: json['sprites'] != null ? json['sprites']['other']['home']['front_default'] : null,
abilities: json['abilities'][0]['ability']['name'] ?? 'Unkwown',
);
}
The function above has a factory constructor called "fromJson" that takes a "Map<String, dynamic>" as input (json).
Inside the "fromJson" factory constructor, it extracts the required data from the json map and assigns them to the class properties.
The "type" is extracted from the JSON structure: json['types'][0]['type']['name']. If it is not available, the default value 'Unknown' is used.
The "height" is extracted from json['height']. If it is not available, the default value 0 is used.
The "weight" is extracted from json['weight']. If it is not available, the default value 0 is used.
The "id" is extracted from json['id']. If it is not available, the default value 0 is used.
The "name" is extracted from json['species']['name']. If it is not available, the default value 'Unknown' is used.
The “sprites” are extracted from json['sprites']['other']['home']['front_default']. If it is not available, it is assigned as null.
The “abilities” are extracted from json['abilities'][0]['ability']['name']. If it is not available, the default value 'Unknown' is used.
The purpose of this code is to provide a way to convert the JSON data into a Dart object (PokemonInfo) that represents Pokemon information. The fromJson factory constructor is responsible for extracting the necessary data from the JSON map and creating an instance of the "PokemonInfo" class.
Fetch Pokémon Data from the API
Now that we have the foundation in place, let's fetch Pokémon data from the API and dynamically populate our cards. We'll modify our "fetchData()" function we talked about in the Making HTTP Requests with Dart section to handle this:
Create a folder inside the lib folder called services, and then in this services folder, you’ll create a file called "networking.data"; this is the file where you will write the code for the HTTP GET request;
Import the necessary packages which are “dart convert” and "http_package".
import' dart:convert';
import 'package:http/http.dart' as http;
The next thing you will do is to create a function similar to the one in “Making a GET request”
Get the API URL and endpoints
This is the API URL: 'https://pokeapi.co/api/v2/pokemon/
The endpoint is: /ditto
N/B: you will change the endpoint to use a number to index the character instead of a name.
Future<PokemonInfo> getpokemondata() async {
String url = 'https://pokeapi.co/api/v2/pokemon/1';
final response = await http.get(Uri.parse(url));
if (response.statusCode == 200) {
String data = response.body;
final decodedData = jsonDecode(data);
return PokemonInfo.fromJson(decodedData);
} else {
throw 'failed to load data : ${response.statusCode}';
}
}
}
There is a debugging technique to know if your request was successful or unsuccessful, which is to print the "response.statusCode" or the "response.body" in the if statement, it will tell you what status code you got; 200 means it was successful, but remember to remove the print statement after verifying.
print( response.statusCode);
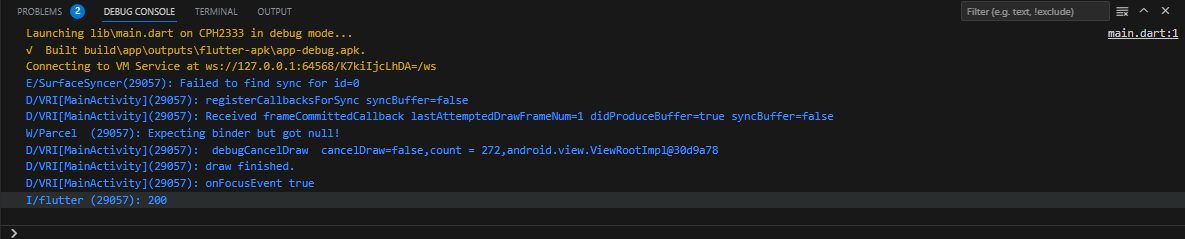
Fig 2. Status code on debug console
print(data);

Fig 3. Response body on the debug console
The "getPokemonData()" function above uses the "HTTP GET" function from the HTTP package in Dart to request data from the Pokémon API by parsing the URL value into the GET function. If the response is successful, you receive the details of a specific Pokémon and parse them to the dart object you created earlier. If the response is unsuccessful, you will receive an error.
Parse the API Response and Extract Relevant Data
Once the API response is obtained, the next step is to parse the response and extract the relevant data. In this case, the response is in JSON format, so we use the "jsonDecode()" function from the "dart:convert" package to convert the JSON data into a Dart object.
final Data = jsonDecode(response.body);
The Data variable now holds the parsed JSON response as a Dart object. You can extract specific information about the Pokémon from this object, such as its name, abilities, stats, types, etc.
For example, if you want to extract the name of the Pokémon, you can access it using the appropriate key or field from the parsed object:
final pokemonName = Data['name'];
Similarly, you can extract other relevant information based on the structure of the API response. But you will not access the information like the above; you will access it from the "PokemonInfo" class you created that receives the response from the API and holds it for future use.
Display the Pokemon Data on the Pokemon Card
This section is where we use the data we have gotten from the API to populate our card.
Create a file in the lib folder called "home.dart", where you will use the flipping card we created to show the Pokemon data.
import 'dart:math';
import 'package:flutter/material.dart';
import 'package:flutter_spinkit/flutter_spinkit.dart';
import 'package:pokemon_card/models/pokemon.dart';
import 'package:pokemon_card/services/networking.dart';
import 'utilities/fliping_card.dart';

class HomePage extends StatefulWidget {
  const HomePage({
    super.key,
  });
  @override
  State<HomePage> createState() => _HomePageState();
}
class _HomePageState extends State<HomePage> {
  late Future<PokemonInfo> getpokemon;
  @override
  void initState() {
    getpokemon = getpokemondata(context, number);
    super.initState();
  }
  @override
  Widget build(BuildContext context) {
    return Scaffold(
      backgroundColor: Colors.purpleAccent,
      appBar: AppBar(
        backgroundColor: Colors.purple,
        elevation: 0,
        title: const Center(child: Text('POKEMON CARD')),
      ),
      body: Column(
        children: [
          const SizedBox(height: 35),
          Expanded(
            child: FutureBuilder<PokemonInfo>(
                future: getpokemon,
                builder: (BuildContext context,
                    AsyncSnapshot<PokemonInfo> snapshot) {
                  if (snapshot.connectionState == ConnectionState.waiting) {
                    return const SpinKitRotatingPlain(
                      size: 20,
                      color: Colors.yellow,
                    );
                  }
                  if (snapshot.hasError) {
                    return Text(snapshot.error.toString());
                  } else {
                    return FlippingPokemonCard(
                      abilities: snapshot.data!.abilities,
                      height: snapshot.data!.height,
                      id: snapshot.data!.id,
                      name: snapshot.data!.name,
                      sprites: snapshot.data?.sprites ??
                          "https://raw.githubusercontent.com/PokeAPI/sprites/master/sprites/pokemon/other/home/1.png",
                      type: snapshot.data!.type,
                      weight: snapshot.data!.weight,
                    );
                  }
                }),
          ),
          const SizedBox(
            height: 10,
          ),
        ],
      ),
    );
  }
}
Let's start with the imports in the "home.dart" file;
package:flutter/material.dart: This import provides Flutter's Material UI components.
package:flutter_spinkit/flutter_spinkit.dart: This import includes pre-built loading spinners.
package:pokemon_card/models/pokemon.dart: This import refers to the PokemonInfo class that represents Pokémon information.
package:pokemon_card/services/networking.dart: This import refers to the "getpokemondata" function fetching Pokémon data from a network.
utilities/fliping_card.dart: This import is for the FlippingPokemonCard widget that represents the Pokémon card with flipping animation.
After that, Create a "StatefulWidget" called "HomePage", which represents the application's main page. The constructor doesn't have any parameters, and it overrides the "createState" method to create an instance of the "_HomePageState" class.
In the "HomePage" declare the necessary variable "getpokemon"
late Future<PokemonInfo> getpokemon;
The "getpokemon" variable is a Future variable with the type "PokemonInfo" that holds the result of fetching Pokémon data asynchronously.
In the "initState" method inside the HomePage stateful widget, call the "getpokemondata" function to fetch Pokémon data asynchronously and assign the result to the "getpokemon" variable.
@override
void initState() {
getpokemon = getpokemondata();
super.initState();
}
The "super.initState()" is called to ensure the parent class's initState method is executed.
In the build method, return a "Scaffold" widget that provides the basic structure of the page.
The "Scaffold" has a purple accent background color and an "AppBar" at the top with a purple background.
Scaffold(
backgroundColor: Colors.purpleAccent,
The "AppBar" contains a centered title with the text "POKEMON CARD".
appBar: AppBar(
backgroundColor: Colors.purple,
elevation: 0,
title: const Center(child: Text('POKEMON CARD')),),
The body of the "Scaffold" is a "Column" widget with the following necessary components:
A "SizedBox" for adding vertical spacing.
An "Expanded" widget that contains a FutureBuilder for asynchronously building the Pokémon card based on the fetched data.
Use the Future Builder to Display the Pokemon Card
Let me explain the future builder and how we use it in our project.
The "FutureBuilder" widget is a great tool in Flutter that allows you to handle asynchronous operations and update the user interface based on the current state of the future. It simplifies the process of managing and displaying data that is being fetched asynchronously.
future: "getpokemon" specifies the future that the FutureBuilder will monitor. In this case, "getpokemon" is a function or method that returns a "Future<PokemonInfo>" object.
builder: builder is a callback function that defines the UI based on the current state of the future. It takes in two parameters: the BuildContext and an "AsyncSnapshot<PokemonInfo>" object, representing the future's current state.
Inside the builder function, the code checks the "connectionState" property of the snapshot object to determine the current state of the future.
If the connection state is "ConnectionState.waiting", the future is still in progress. In this case, a SpinKitRotatingPlain widget is returned, which could be a loading indicator or any other widget indicating that the data is being fetched.
FutureBuilder<PokemonInfo>(
future: getpokemon,
builder:
(BuildContext context, AsyncSnapshot<PokemonInfo> snapshot) {
if (snapshot.connectionState == ConnectionState.waiting) {
return const SpinKitRotatingPlain(
size: 20,
color: Colors.yellow,
);
}
If the snapshot has an error, the snapshot.hasError condition will be true. In this case, an error message is displayed using a Text widget, showing the error message obtained from snapshot.error.toString().
if (snapshot.hasError) {
return Text(snapshot.error.toString());
}
If the connection state is not waiting and there is no error (else condition), the future has been completed successfully, and the data is available in "snapshot.data".
else {
return FlippingPokemonCard(
abilities: snapshot.data!.abilities,
height: snapshot.data!.height,
id: snapshot.data!.id,
name: snapshot.data!.name,
sprites: snapshot.data?.sprites ?? "https://raw.githubusercontent.com/PokeAPI/sprites/master/sprites/pokemon/other/home/1.png",
type: snapshot.data!.type,
weight: snapshot.data!.weight,
);
Inside the else block, our FlippingPokemonCard widget is returned, which uses the data obtained from "snapshot.data". This widget receives properties like abilities, height, id, name, sprites, `
So if everything works fine the picture below should be what you see;

Fig 4. Front of the card
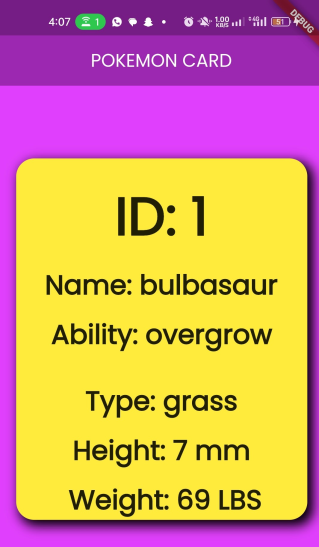
Fig 4. Back of the card
And if it doesn’t work as planned you should see the picture below;
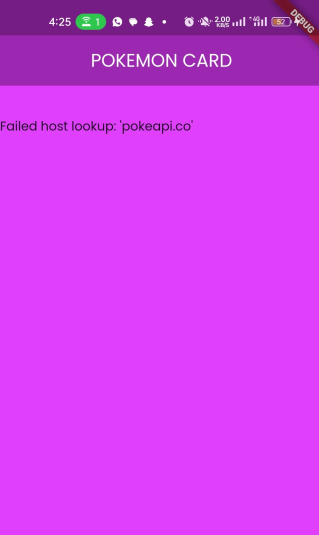
fig 5. Error message
Generate Pokémon Cards Dynamically
We have succeeded in showing a Pokemon character on our card. Still, it's just one character that is showing, and this project aims to randomly generate different Pokemon characters every time a button is pressed, so let's do that now.
So firstly, modify our "getpokemon" function to accept an int value parameter called "characterid";
Future<PokemonInfo> getpokemondata( int characterid) async {
String url = 'https://pokeapi.co/api/v2/pokemon/$characterid';
final response = await http.get(Uri.parse(url));
if (response.statusCode == 200) {
String data = response.body;
final decodedData = jsonDecode(data);
return PokemonInfo.fromJson(decodedData);
} else {
throw 'failed to load data : ${response.statusCode}';
}
}
}
With this int variable in place, you now have a placeholder for the random numbers in the function,
Let's move on to the next part, which is in the "home.dart" file. In this file, create a variable of type int under the "getpokemon" variable and call it "number".
late int number;
The next thing you will do is give the number variable we just created a value inside the "initState", but there's a twist to it; you will not give the variable a static value; you will provide it with a value that changes.
@override
void initState() {
number = Random().nextInt(1000);
getpokemon = getpokemondata(number);
super.initState();
}
The value of the "number" variable is a method from "dart:math" that generates non-negative random numbers within a specific range; in this case, the range is 1000.
Parse this new variable into the instance of our "getpokemondata" function in the "initState", as shown above.
So now you should see a new Pokemon character every time you restart your app. But you are not done yet because you don't want to restart our app every time to display a new character, which brings us to the next part, creating a generate button to generate a new character every time it is pressed.
Create a Custom Button
Create a file in the "utilities" folder called "generate_button.dart", and in this file, you will create the custom button.
import 'package:flutter/material.dart';

class GenerateButton extends StatelessWidget {
  const GenerateButton({super.key, required this.function});

  final  Function()? function;

  @override
  Widget build(BuildContext context) {
    return GestureDetector(
      onTap: function,
      child: Container(
        height: 50,
        width: 150,
        decoration: BoxDecoration(
          borderRadius: BorderRadius.circular(10),
          color: Colors.yellow,
          boxShadow: const [
            BoxShadow(
                color: Colors.black,
                offset: Offset(0, 3.0),
                blurRadius: 1.0,
                spreadRadius: 1.0)
          ],
        ),
        child: const Center(
            child: Text(
          'Generate',
          style: TextStyle(fontSize: 20, fontWeight: FontWeight.w300),
        )),
      ),
    );
  }
}
In the above code, we have successfully created a custom button, which is a stateless widget that returns a container wrapped with the GestureDetector widget.
The GestureDetector widget has a property called "onTap" this property is a "function?" that returns a function of type void, so we created a variable called "function" to receive a function when tapped later.
The "container" also has a child, which is a text widget saying "Generate".
It is time to use the custom button you created in the "home.dart" file,
At the bottom of the "column", let's use the custom button that we named "generateButton", When you use the button, you will see that we get an error saying we have a required parameter called "function" that we need to fill. It is now time to write the function that randomly generates the Pokemon characters.
Under the "initState" is where you’ll put the code below;
void generateRandomPokemon() {
setState(() {
number = Random().nextInt(1000);
getpokemon = getpokemondata(number);
});
}
The code above is a function called "generateRandomPokemon" That doesn't return any value. The main aim of this function is to recall the "number" variable and then parse the new value to the "getpokemondata" function.
The "setState" ensures that when a new int value is parsed, it marks the UI as dirty and reloads the UI with the Pokemon character corresponding with the present int value.
We have finished writing the function to generate a new character for the Pokemon card randomly. It's now time to use this function on the generate button.
GenerateButton(function: generateRandomPokemon),
Fig 6. A button called Generate is tapped, and the character changes
Now, whenever you tap the generate button, the app will reload with a different Pokemon character on the card.
Enhance the User Experience
Loading Indicators
To let the users know that the app is doing some work in the background, you display a loading indicator while fetching data from the API. You can use the CircularProgressIndicator or a package like flutter_spinkit for custom loading spinners, and we used both for this project.
Wrap your FutureBuilder widget's child with the loading indicator widget and conditionally show it based on "snapshot.connectionState".
For example, if the connection state is "ConnectionState.waiting", show the loading indicator widget.
Here's an example code snippet to demonstrate what we did earlier:
if (snapshot.connectionState == ConnectionState.waiting) {
return Center(
 child: CircularProgressIndicator(),
) // or any other loading indicator widget ); }
Error Handling
Error handling in Flutter refers to gracefully handling and managing errors or exceptions that occur during the execution of your app. Flutter provides various mechanisms to handle errors effectively and provide a good user experience. Here are some common error-handling techniques in Flutter:
Try-Catch Blocks
Error Callbacks
Flutter Error Widget
We will be using the try-catch block for this project.
Try-Catch Blocks
try {
// Code that might throw an exception
} catch (e) {
// Handle the exception
}
You can use try-catch blocks to catch and handle exceptions in Dart. The "try" part of the function tries to execute a function and return a value, if, along the way an error occurs, the "catch" part handles it. We will place the "getpokemondata" function that might throw an exception inside a "try" block and use a generic catch block to handle any exception. This will allow us to handle errors and provide appropriate feedback to the user.
Future<PokemonInfo> getpokemondata(int characterid) async {
  try {
    String url = 'https://pokeapi.co/api/v2/pokemon/$characterid';
    final response = await http.get(Uri.parse(url));
    if (response.statusCode == 200) {
      String data = response.body;
      final decodedData = jsonDecode(data);
      return PokemonInfo.fromJson(decodedData);
    } else {
      throw 'failed to load data : ${response.statusCode}';
    }
  } catch (e) {
    throw e.toString();
  }
}
At this point, the error handling of the app is 90 percent complete; the remaining 10 percent is the fact that we are catching the exception but not notifying the users of what is going on. Let's fix that by showing the users a dialog box anytime we catch an exception.
Create a Dialog Box
To create a dialog box for this project, Create a file in the "utilities" folder called "show_error_dialog.dart", where we will write the code to show the dialog box.
import 'package:flutter/material.dart';

Future<void> showErrorDialog(
  BuildContext context,
  String text,
) {
  return showDialog(
      context: context,
      builder: (context) {
        return AlertDialog(
          title: const Text('An error occurred'),
          content: Text(text),
          actions: [
            TextButton(
                onPressed: () {
                  Navigator.of(context).pop();
                },
                child: const Text('OK'))
          ],
        );
      });
}
This code snippet above is the function that will display an error dialog to the user.
Let's break it down step by step:
The function "showErrorDialog" takes two parameters: "context", which is the current "BuildContext" of the app, and "text", which is the error message to be displayed in the dialog.
Then inside the function, we call the "showDialog" function, which is a built-in Flutter method that displays a dialog on the screen.
The "showDialog" function takes a "context" parameter and a "builder" function that returns the content of the dialog. The "builder" function is defined as "(context)", where context represents the "BuildContext" passed to it. It returns an "AlertDialog" widget, a pre-designed dialog widget.
The "AlertDialog" widget has a title, content, and actions. The title is set to 'An error occurred', and the content is set to the "text" parameter containing the error message.
In the actions property, we set a list containing a single "TextButton" widget. This button is labeled 'OK' and has an "onPressed" callback that closes the dialog by calling "Navigator.of(context).pop()". Finally, the "showDialog" function is returned, which displays the error dialog for the user.
You have to change the "getpokemondata" function again to show a dialog box when an exception is caught.
Future<PokemonInfo> getpokemondata(
    BuildContext context, int characterid) async {
  try {
    String url = 'https://pokeapi.co/api/v2/pokemon/$characterid';
    final response = await http.get(Uri.parse(url));
    if (response.statusCode == 200) {
      String data = response.body;
      final decodedData = jsonDecode(data);
      return PokemonInfo.fromJson(decodedData);
    } else {
      throw 'failed to load data : ${response.statusCode}';
    }
  } catch (e) {
    showErrorDialog(context, 'An error occurred: $e');
    throw e.toString();
  }
}
The "BuildContext" which is added to the parameter of the "getpokemondata" function, is an object that represents the location of a widget within the widget tree hierarchy. It provides access to various information and functionalities related to the widget's position and the overall app context.
The "showErrorDialog" function, which we have added to the "catch" part of the try-catch block, is the custom function we created to display an error dialog to the user. It takes two parameters:
context: This is the "BuildContext" of the current widget. It is required to show the dialog within the appropriate context of the app.
text: This parameter represents the error message to be displayed in the dialog; in this case, it is the error that occurred.
You have successfully handled any exception that may occur during the fetching of the data from the API. Also, you have created a dialog box to notify the user about the exception.
If you can recall, you called "getpokemondata" at two places in the "home.dart" file, so at this point, you should be having an error saying, "2 positional arguments expected by 'getpokemondata', but 1 found. Try adding the missing arguments".
Don't panic; all you have to do is add "context" to the function, and the error should go away. By parsing the "context" from the calling widget to the getpokemondata" function, we ensure that the error dialog is displayed within the correct context of the app. This is important because the dialog needs to overlay the current screen and be aware of the app's state and navigation stack.
Anytime there’s an error, the "try-catch" block will catch it, and we will also let the user know what is going on.

Fig 7. Alert dialog box
In "home.dart", you can say we are handling errors because you are using the "FutureBuilder" widget's "snapshot.hasError" property to check if an error occurred, and if an error occurs, we display an error message to the user. but you are not giving the user any dialog box to execute an action.
Conclusion
This comprehensive guide taught you how to create an immersive Pokémon Card app using Dart and Flutter. By leveraging REST APIs, making network requests, handling data, and designing captivating user interfaces, you've gained valuable insights into the app development world using Flutter. The Pokémon Card app is a fun example of how to use APIs in our application and learn about Pokemon characters. With the foundation you've built, you can continue to enhance the app by implementing additional features such as search functionality and card sorting.
Here is the link to the GitHub repo: https://github.com/emjaycodes/pokemon_card
Don't forget to leave a star on the repo.


